Real-Time Picture-in-Picture Camera Feeds on your TV with Home Assistant
I’ve found a way to get a RTSP camera feed to display in a picture-in-picture popup on my TV, without interrupting any other viewing that might be going on. This all happens locally, without any cloud services, and should work with any IP camera that provides an RTSP stream. This is achieved using a modest IP camera, an Android TV (in my case an Nvidia Shield set top box), a side-loaded app called Pipup on the Android TV and Home Assistant. Read on to find out how.
Update, June 2023. Things have moved on since I initially wrote this post. In particular, go2rtc was launched, which I now use instead of either of the WebRTC Camera or RTSPtoWeb options I discuss below. I have therefore rewritten this guide, and I recommend you head over to the new version instead.
Home Assistant natively allows you to cast a camera feed to an Android TV, but when I tried to embrace this feature I found two big drawbacks. First, any content that is already being played will be rudely interrupted. For example, your Netflix show will be replaced by the doorbell feed, and you’ll need to navigate back into it again to restart it. Second, video latency can very bad. If your video is from a cloud-based camera, like a Ring or Nest doorbell, you will have the unavoidable delay added by the internet roundtrip, plus the processing delay on the cloud server. In my experience, this can be shocking 5-15 seconds under normal conditions. However, even for local video streams from IP cameras, Home Assistant adds a processing delay. My best understanding is that this processing delay is related to Home Assistant transcoding the IP camera stream into HLS (via the generic_camera, stream and ffmpeg integrations), so they can be consumed in a web browser. A stream delay of 10+ seconds is a problem for all of us who want our door camera to usefully display when someone presses the doorbell. In my limited testing, the normal result is that I get to watch an action replay of my awkward pandemic-era tipping interaction with the delivery guy as soon as I plop myself back in the couch. No one wants that.
Fixing this involved: (1) fixing camera feed performance, (2) making picture-in-picture (PiP) work on android TV, and (3) sending the camera feeds into the new PiP feature.
Fixing Camera Feed Performance
I did my testing using a €60 Reolink 520A PoE IP camera, which is hardwired into the same gigabit network as my workstation and the Home Assistant host (a Home Assistant Blue, i.e., an Odroid N2+). This camera provides an high-res (“main”) and a low-res (“sub”) RTSP stream, which I could open directly in VLC. I could open the “sub” RTSP stream in VLC (at a URL like rtsp://admin:PASSWORD@IP_ADDRESS:554//h264Preview_01_sub), and enjoy less than 1 second latency at about 25 FPS. However, if I viewed the same camera feed through Home Assistant, there was a delay in the stream of up to 10 seconds, and a lot of stuttering. I see two reasons for the performance problems:
- Home Assistant is trying to transcode the RTSP stream in real-time. This will add a processing delay, which will also vary depending on system load.
- Viewing a real-time stream over TCP (i.e., HTTP) is not optimal. Any congestion between the Home Assistant host, the router and the web browser will lead to dropped packets, which will cause TCP to pause the stream while it spends seconds trying to confirm retransmission (instead of forgetting about the past, and focussing on the present). The optimal solution is to display the original RTSP stream (which is UDP, not TCP) in the web browser. Unfortunately, web browsers do not support viewing raw RTSP streams. This is why Home Assistant is transcoding them in the first place.
After exploring some options, I found a great solution in WebRTC Camera, which builds on RTSPtoWebRTC. My career in the video games industry and my adventures in the adblock wars have given me lots of experience implementing low level networking, designing real-time protocols and using WebRTC for inventive purposes, so thankfully I understand the fundamentals of this already. WebRTC is a browser technology that is designed for realtime media. Unlike every other protocol that web browsers speak, WebRTC is based on UDP. UDP is fast instead of reliable. In this case, UDP allows the stream to move on when a video or audio frame gets lost, instead of stalling the stream and spending seconds trying to recover the old data. If you do video calls in your web browser without using fancy plugins, then that video and audio may well be running over WebRTC.
Time for a quick comparison of the WebRTC Camera integration vs the RTSPtoWeb Add-On. One day after I published this, I noticed that Allen Porter had published the RTSPtoWeb Add-On, as an alternative to WebRTC Camera. This is very exciting, because WebRTC Camera is based on the deprecated RTSPtoWebRTC, while Allen’s new add-on is based on its successor RTSPtoWeb. Architecturally, one is an integration for Home Assistant Core, while the other is an Add-On for Home Assistant Supervisor (see discussion between their respective authors here). As an integration, WebRTC Camera provides a custom card, and (in an arguably hacky way) downloads the RTSPtoWebRTC proxy server binary into your
/configdirectory, and runs it. Alternatively, as a Supervisor Add-On, RTSPtoWeb Add-On arranges for the Home Assistant Supervisor to run the RTSPtoWeb proxy in a new Docker container, which is then available for use by the native RTSPtoWebRTC integration that was released very recently in v2022.2, which adds native WebRTC support into regular picture glance cards. The RTSPtoWeb Add-On approach is clearly less hacky, more elegant and leverages new native functionality. I expect it to replace WebRTC Camera, and I’m looking forward to this happening, however the following drawbacks are keeping me from switching just yet:
- You can’t watch video streams from outside your network, because Home Assistant’s native WebRTC player doesn’t yet support NAT traversal, which is necessary to route UDP traffic between your device and the RTSPtoWeb proxy. (see this issue).
- Audio is not yet supported by RTSPtoWeb. You can support it by switching back to the older RTSPtoWebRTC, but that would eliminate a lot of the benefit of upgrading from WebRTC Camera.
- Security. The WebRTC Camera integration provides a service that allows short-lived non-guessable video URLs to be created for use in notifications. I don’t know how to achieve similar functionality with the RTSPtoWeb addon, and expect I would need to expose the RTSPtoWeb proxy to the internet via port forwarding, which is a security concern.
In contrast to Home Assistant’s default camera transcoding, WebRTC Camera uses RTSPtoWebRTC as a light-weight proxy between the RTSP and WebRTC protocols. It basically repackages the data as-is from RTSP UDP packets into WebRTC UDP packets, without doing any CPU-intensive transcoding of the video payload. This effectively eliminates your Home Assistant’s CPU as a bottleneck, resulting in a fantastic reduction in video stream delay. WebRTC Camera also provides a custom lovelace card that you can use to view the WebRTC video streams.
WebRTC Camera can be installed via HACS, and then can you enable it via Home Assistant’s “Configuration > Devices & Services > Integrations”.
I encountered a strange problem where the custom webrtc-camera card was only intermittently found by the lovelace UI (resulting in “Custom element doesn’t exist” errors where the card should be in the UI). To resolve this I manually added the relevant JS module in my Lovelace resources. You can do this from “Configuration > Dashboards > Resources”, or if you use Lovelace in YAML mode, by adding something like the following:
lovelace:
  # ...
  resources:
    # ...
    - url: /webrtc/webrtc-camera.js?v2.2.0
      type: module
I could then add WebRTC camera cards to my UI by adding a “manual” card with yaml like this (where “PASSWORD” is redacted AND “CAMERA IP” represents the local camera IP address):
type: 'custom:webrtc-camera'
url: 'rtsp://admin:PASSWORD@CAMERA_IP:554//h264Preview_01_sub'
It is also possible to avoid embedding the literal RTSP stream in the UI yaml. A more elegant approach is to create a generic_camera entity, and then to reference that. I use a split configuration, so I added the following to my configuration.yaml (“IP_CAMERAS” is a label so that this doesn’t interfere with other top-level camera: definitions):
camera IP_CAMERA: !include ip_cameras.yaml
Then I created ip_cameras.yaml to define various IP cameras and their RTSP streams:
- platform: generic
  name: Front Driveway RTSP
  stream_source: rtsp://admin:PASSWORD@CAMERA_IP:554//h264Preview_01_sub
  # Following line not necessary, but added Reolink snapshot URL for completeness:
  still_image_url: http://CAMERA_IP/cgi-bin/api.cgi?cmd=Snap&channel=0&user=admin&password=PASSWORD
Now, the WebRTC cards can be changed to reference the camera entity (from which it will extract the RTSP stream):
type: 'custom:webrtc-camera'
entity: camera.front_driveway_rtsp
background: true # Keeps stream active even when not displayed, to speed up loading.
At this point, WebRTC streams were working inside my network, but I couldn’t access them outside my house. This is because they run over UDP, and my router was simply rejecting all those unexpected inbound UDP packets. To fix this, I needed to set up some port forwarding at my router. As recommended by in the documentation I forwarded UDP traffic on 10 ports (50000-50010) from my WAN address to my Home Assistant host’s LAN address. I then navigated to the integration’s config options (“Configuration > Devices & Services > Integrations > WebRTC Camera”) and told the WebRTC integration that these ports were available for it to use. I could then view the WebRTC video streams from outside my network.
I run the excellent Nginx Proxy Manager addon so that I can securely access my Home Assistant when I am away from the house, without proxying through any remote internet servers. I had previously run an Nginx reverse proxy on a VPS server, but this added unacceptable latency, an extra point of failure, and unnecessary bandwidth cost when trying to stream live video remotely. Now when I access a video stream remotely, the traffic consists of UDP packets traveling from my phone to my home router, with no additional bandwidth costs. The popular alternative is to forward HTTPS traffic directly to Home Assistant Core configured with DuckDNS/LetsEncrypt, but this entirely disables unencrypted HTTP, and effectively prevents you from directly accessing your Home Assistant via its local network address. In contrast, the Nginx Proxy Manager approach keeps your Home Assistant accessible over both HTTPS (via your public domain name) and HTTP (via your local LAN address). This gives you the best of all worlds - security, performance and peace of mind that you will still be able to access your Home Assistant if your internet goes down. I recommend it!
The performance difference between the new WebRTC streams and the standard HLS streams was considerable. Viewing them side-by-side from my workstation on my LAN, I could see a significant difference in quality and in timeliness.
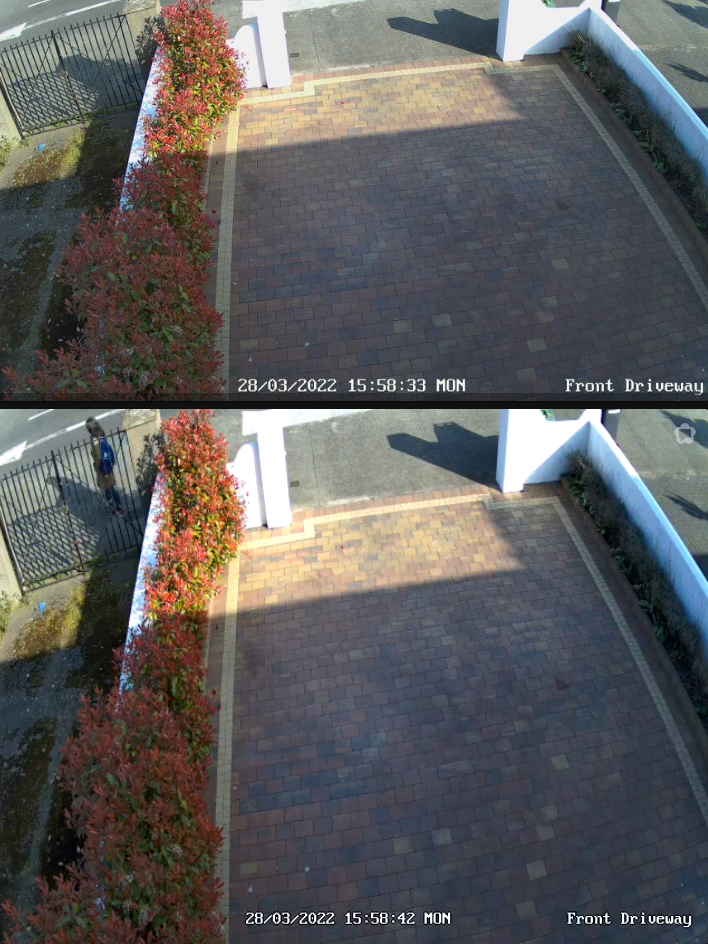
The bottom camera is the WebRTC stream, which has a delay of about 1 second, with a fluid framerate. The top stream is the HLS version, which stutters badly, and is captured here 9 seconds late, relative to the WebRTC stream. The difference is significant enough that the person visible in the WebRTC stream was never captured in the HLS stream.
Picture-in-Picture on Android TV
Android TV doesn’t provide a native API to allow the display of picture-in-picture popups. However, you can use the PiPup app on your Android TV to display the popups for you. PiPup provides a REST API, which you can communicate with from Home Assistant.
The original PiPup repository hasn’t been updated in a few years, and has some important outstanding pull requests. Therefore, we cannot install it in the recommended way. We need madjam002’s pull request (also discussed in this issue), which adds support for displaying embedded web content with javascript. In addition, desertblade has added a fix in his fork that makes PiPup properly close its connection to Frigate when it’s done. Therefore, I recommend you use desertblade’s build. Download that APK (“app-debug.apk”).
Make sure you have enabled developer options on your Android TV, and know what its IP address is (instructions are given on Stackoverflow here).
The following commands assume you have ADB installed on your workstation, and that you are running Linux or MacOS. If you are running Windows, grep and/or curl might be missing or work differently for you (you can instead use equivalent Windows commands, or install Windows versions of the grep and curl commands from something like GnuWin32, or skip testing the installation with the grep and curl bits below).
adb connect YOUR_ANDROID_TV_IP_ADDRESS
adb install app-debug.apk

# Confirm installation
adb shell pm list packages | grep pip
# Note that the apk identifies itself as "nl.rogro82.pipup"
# Grant permissions for it to draw a system alert window (required on Nvidia Shield at least)
adb shell appops set nl.rogro82.pipup SYSTEM_ALERT_WINDOW allow
Before you can test it, you need to start PiPup on your TV, so that it’s running in the background.
You can now confirm that it is working by using cURL to post a command to the app’s REST API. Put this example payload (copied from the original docs) into a file post.json:
{
    "duration": 30,
    "position": 0,
    "title": "Your awesome title",
    "titleColor": "#0066cc",
    "titleSize": 20,
    "message": "What ever you want to say... do it here...",
    "messageColor": "#000000",
    "messageSize": 14,
    "backgroundColor": "#ffffff",
    "media": {
        "image": {
            "uri": "https://mir-s3-cdn-cf.behance.net/project_modules/max_1200/cfcc3137009463.5731d08bd66a1.png",
            "width": 480
        }
    }
}
Now POST it to your TV, and you should see a popup (replace ANDROID_TV_IP_ADDRESS).
curl -d "@post.json" -H "Content-Type: application/json" -X POST http://ANDROID_TV_IP_ADDRESS:7979/notify
Displaying PiP Camera Feeds
Use the RESTful command integration to interact with PiPup from Home Assistant. I use a split YAML configuration, so I enabled it by adding the following to configuration.yaml:
rest_command: !include rest_commands.yaml
I then created rest_commands.yaml and added the following two commands to it (replace ANDROID_TV_IP_ADDRESS as appropriate):
pipup_image_on_tv:
  # Use Pipup to display image notifications on Android TV devices.
  url: http://ANDROID_TV_IP_ADDRESS:7979/notify
  content_type: 'application/json'
  verify_ssl: false
  method: 'post'
  timeout: 20
  payload: >
    {
      "duration": {{ duration | default(20) }},
      "position": {{ position | default(0) }},
      "title": "{{ title | default('') }}",
      "titleColor": "{{ titleColor | default('#50BFF2') }}",
      "titleSize": {{ titleSize | default(10) }},
      "message": "{{ message }}",
      "messageColor": "{{ messageColor | default('#fbf5f5') }}",
      "messageSize": {{ messageSize | default(14) }},
      "backgroundColor": "{{ backgroundColor | default('#0f0e0e') }}",
      "media": {
        "image": {
          "uri": "{{ url }}",
          "width": {{ width | default(640) }}
        }
      }
    }


pipup_url_on_tv:
  # Use with Webrtc camera as described here:
  # https://github.com/AlexxIT/WebRTC/wiki/Cast-or-share-camera-stream#html-page
  url: http://ANDROID_TV_IP_ADDRESS:7979/notify
  content_type: 'application/json'
  verify_ssl: false
  method: 'post'
  timeout: 20
  payload: >
    {
      "duration": {{ duration | default(20) }},
      "position": {{ position | default(0) }},
      "title": "{{ title | default('') }}",
      "titleColor": "{{ titleColor | default('#50BFF2') }}",
      "titleSize": {{ titleSize | default(10) }},
      "message": "{{ message }}",
      "messageColor": "{{ messageColor | default('#fbf5f5') }}",
      "messageSize": {{ messageSize | default(14) }},
      "backgroundColor": "{{ backgroundColor | default('#0f0e0e') }}",
      "media": {
        "web": {
          "uri": "{{ url }}",
          "width": {{ width | default(640) }},
          "height": {{ height | default(480) }}
        }
      }
    }
After a restart, we have two new services available: rest_command.pipup_image_on_tv and rest_command.pipup_url_on_tv. We can pass parameters to these services as follows (you can try this out “Developer Tools > Services”):
service: rest_command.pipup_image_on_tv
data:
  title: hey
  message: I can see you
  titleColor: red
  position: 0
  url: https://mir-s3-cdn-cf.behance.net/project_modules/max_1200/cfcc3137009463.5731d08bd66a1.png
The above values can be templated. For example, camera entities in Home Assistant typically have a entity_picture attribute that contains a URL to a current camera snapshot (including a short-lived auth token). To display a camera snapshot, you could call the service as follows from an automation (replace <PUBLIC_ROOT_URL> with the literal value of your public Home Assistant root URL, e.g., “https://example.duckdns.org:8123/”):
service: rest_command.pipup_image_on_tv
data:
  title: Doorbell
  message: "There's somebody at the door"
  url: <PUBLIC_ROOT_URL>{{ state_attr('camera.driveway_doorbell', 'entity_picture') }}"
Displaying an image in this way is nearly instantaneous, but if you can tolerate 1-2 seconds for a video stream to initialize, you can also show the live video stream using WebRTC. To do this, we use the webrtc.create_link service (documented here) to generate a temporary video stream webpage at a nominated URL. We then send the URL of that page to the PiPup service.
To put this together, we need to create a Home Assistant script, which gives us the ability to store a random ID in a variable, which we can then pass into the webrtc.create_link service and then into the rest_command_pipup_url_on_tv service.
Here is the yaml of a working script, which you can add to your scripts.yaml or define using the UI at “Configuration > Automations & Scenes > Scripts” (remember to replace PUBLIC_ROOT_URL):
display_driveway_pip_popup_on_tv:
  alias: Display Driveway PIP Popup on TV
  mode: single
  variables:
    link_id: '{% for _ in range(40) %}{{ range(10)|random }}{% endfor %}'
  sequence:
  - service: webrtc.create_link
    data:
      link_id: '{{ link_id }}'
      entity: camera.front_driveway
      open_limit: 1
      time_to_live: 60
  - service: rest_command.pipup_url_on_tv
    data:
      title: Door
      message: Someone is at the front door
      width: 640
      height: 480
      url: PUBLIC_ROOT_URL/webrtc/embed?url={{ link_id }}&webrtc=false
Now, whenever you want to pop the camera feed up on your TV, just call script.display_driveway_pip_popup_on_tv.
The final piece is to make sure that PiPup is running when we need it, so you don’t manually need to start it every time you restart your Android TV box. We can do this by sending the following command to the Android box via Home Assistant’s ADB integration:
ps -ef | grep -v grep | grep pipup || am start nl.rogro82.pipup/.MainActivity
Here is what that looks like as an automation:
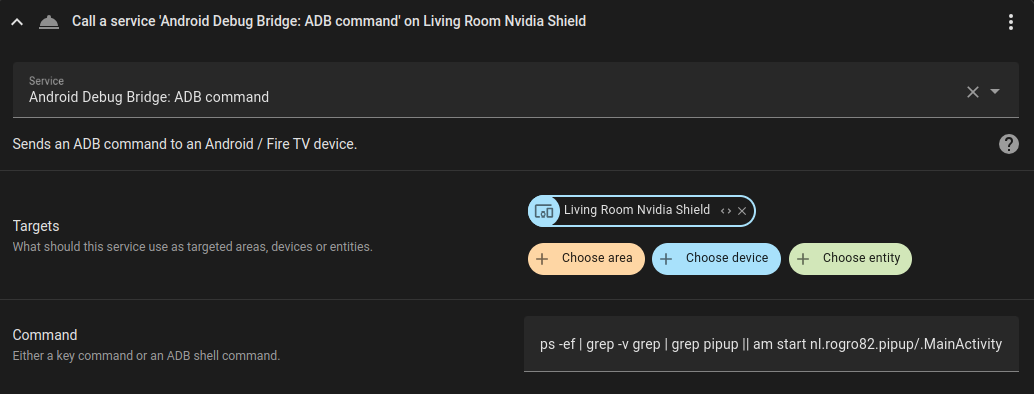
Here is the yaml version of that step in the automation:
service: androidtv.adb_command
data:
  command: >-
    ps -ef | grep -v grep | grep pipup || am start nl.rogro82.pipup/.MainActivity
target:
  device_id: 014b02b50b1142bd5738bae18f5df54d
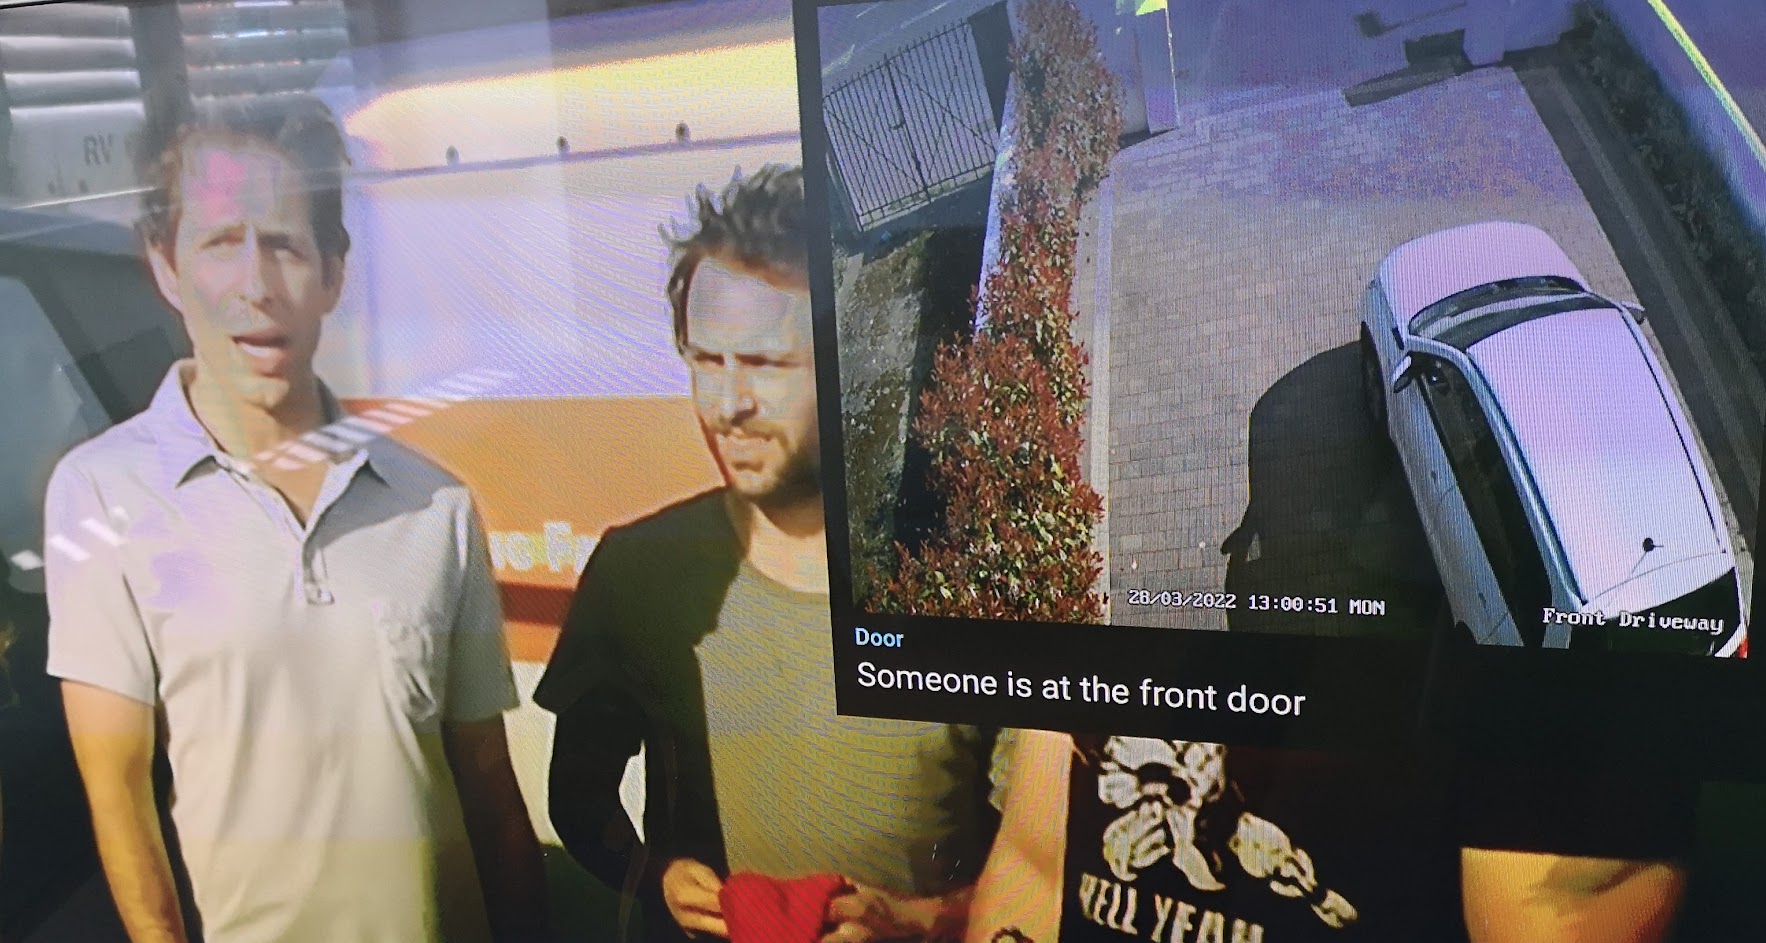 The above image is still showing a feed from my driveway camera instead of my doorbell camera. The next step is to get rid of my Nest Camera and replace is with something better. I’ll cover that in my next post.